Popular Posts
-
Elegant Themes has been developing WordPress themes for a long time. It has developed lots of popular themes including Divi, Nexus, Fa...
-
How to start a blog or website in 5 minutes with WordPress. After publishing the post on how I started blogging full-time, I'v...
-
Hello there! My blog post 'Spikes' was published on Sept. 22nd; however, the post before it called 'Flow' was published on...
-
Hot Off the Press Jenny Diski on Writing, Love, and Cancer Photo by heipei Mark Armstrong Jun 17, 2015 @ 2:07 ...
-
It has not only changed the traditional perspective of buyers and sellers, but also revolutionized the entire concept of retail busine...
-
Chukwuemeka Fred Agbata Jnr. Two weeks ago, I started a piece focusing on mobile apps that can aid your productivity. I already wrote ...
-
Content marketing and SEO has evolved quite a bit over the past few years. Google re...
-
What is the exact URL of the site you deleted? If you are referring to a site that was hosted by wordpress.COM, the relevant wordpress.C...
-
Google has some big plans when it comes to making the web faster on your mobile phone. The company just added AMP-enabled pages in its mobil...
-
WordPress has rolled out a new version dubbed 4.2.3 of its content management system (CMS) to patch a critical cross-site scripting (XSS) vu...


How to Add Load More Posts Button in WordPress
Do you want to add a load more posts button in WordPress? Many popular platforms allow users to load more posts when they reach to the bottom of the page. In this article, we will show you how to easily add a load more posts button in WordPress.

Keeping your users engaged with the content helps you get more views and ultimately more subscribers.
Many blogs use the simple 'Older posts' navigation link at the end of their home, blog, and archive pages. Some websites use numeric page navigation which adds more context.
However, there are certain type of websites that can benefit immensely from infinite scroll or load more posts button. Some examples include: photography websites, listicles, and viral content websites.
Instead of loading a whole new page, 'load more posts' button works like infinite scroll. It uses JavaScript to quickly fetch the next set of content. This improves user experience and gives them a chance to view more of your content.
That being said, let's take a look at how to easily add load more posts button in your WordPress site.
Adding Load More Posts Button in WordPressFirst thing you need to do is install and activate the Ajax Load More plugin. For more details, see our step by step guide on how to install a WordPress plugin.
Upon activation, the plugin will add a new menu item labeled 'Ajax Load More' to your WordPress admin menu. You need to click on it and head over to the plugin's settings page.

On the settings page, you can choose the color of your button. You can also replace the button with infinite scroll which loads next batch of posts automatically without users clicking on the button.
Next, you need to visit Ajax Load More » Repeater Template page to add your template for displaying posts.
The plugin comes with a basic template containing the WordPress loop to display posts. However, it does not match your theme and may look out of place on your website.
To fix this, you need to copy the code your theme uses to display posts on index, archive, and blog pages.
Normally, this code is located in the template-parts folder of your theme. In that folder, you will see templates to display different content. For example content-page.php, content-search.php, and more.
You will be looking for the generic content.php template. Here is an example from our demo theme's content.php file:
<article id="post-<?php the_ID(); ?>" <?php post_class(); ?>> <?php // Post thumbnail. twentyfifteen_post_thumbnail(); ?> <header class="entry-header"> <?php if ( is_single() ) : the_title( '<h1 class="entry-title">', '</h1>' ); else : the_title( sprintf( '<h2 class="entry-title"><a href="%s" rel="bookmark">', esc_url( get_permalink() ) ), '</a></h2>' ); endif; ?> </header><!-- .entry-header --> <div class="entry-content"> <?php /* translators: %s: Name of current post */ the_content( sprintf( __( 'Continue reading %s', 'twentyfifteen' ), the_title( '<span class="screen-reader-text">', '</span>', false ) ) ); wp_link_pages( array( 'before' => '<div class="page-links"><span class="page-links-title">' . __( 'Pages:', 'twentyfifteen' ) . '</span>', 'after' => '</div>', 'link_before' => '<span>', 'link_after' => '</span>', 'pagelink' => '<span class="screen-reader-text">' . __( 'Page', 'twentyfifteen' ) . ' </span>%', 'separator' => '<span class="screen-reader-text">, </span>', ) ); ?> </div><!-- .entry-content --> <?php // Author bio. if ( is_single() && get_the_author_meta( 'description' ) ) : get_template_part( 'author-bio' ); endif; ?> <footer class="entry-footer"> <?php twentyfifteen_entry_meta(); ?> <?php edit_post_link( __( 'Edit', 'twentyfifteen' ), '<span class="edit-link">', '</span>' ); ?> </footer><!-- .entry-footer --> </article><!-- #post-## -->Once you find that code, you need to paste it inside the Repeater Templates field in plugin settings.
Don't forget to click on the 'Save Template' button to store your settings.
Next, you need to visit Ajax Load More » Shortcode Builder page to generate the shortcode.
This page contains many different options that you can customize. First you will need to select the container type. If you are unsure, just look at the template you copied earlier. Most modern themes use the <div>; element.
After that scroll down to the button labels section. Here you can change the text that appears on the button. By default, plugin uses 'Older Posts', and you can change that to 'Load more posts' or anything you want.

Lastly, you need to choose whether you want posts to load automatically or wait for users to click on the load more posts button.

Your shortcode is now ready to be used. In the right column, you will see the shortcode output. Go ahead and copy the shortcode and paste it in a text editor as you will need it in the next step.

This part of the tutorial requires you to add code into your WordPress theme files. If you haven't done this before, then take a look at our guide on how to copy and paste code in WordPress.
Don't forget to backup your WordPress theme before making any changes.
You will need to find the template files where you want to add the load more posts button in your theme. Depending on how your theme is organized, usually these files are index.php, archives.php, categories.php, etc.
You will need to add the shortcode you copied earlier into your theme right after the endwhile; tag.
Since we are adding the shortcode in a theme file, we will need to add it inside the do_shortcode function, like this:
echo do_shortcode('[ajax_load_more container_type="div" post_type="post"]');You can now save your changes and visit your website to see the 'Load more posts' button in action.

We hope this article helped you learn how to add load more posts button in WordPress. You may also want to see our mega list of the most useful WordPress tips, tricks, and hacks for beginners.
If you liked this article, then please subscribe to our YouTube Channel for WordPress video tutorials. You can also find us on Twitter and Facebook.
Source: How to Add Load More Posts Button in WordPress
MarsEdit 4 Update Adds Editor Enhancements, WordPress Improvements, and More
MarsEdit, Red Sweater Software's macOS blog editor, received a major update today with new features and a UI refresh.
Among the long list of updates to version 4 of MarsEdit are several modifications to the app's editor. Common formatting options like bold, italics, and underlining are easily accessed from a formatting bar. A new typewriter view option keeps text centered in the middle of the editor as you type. If you edit in rich text mode, MarsEdit also lets users resize images by direct manipulation, and the app's previewer has added MultiMarkdown support.
For WordPress users, MarsEdit has added support for featured images in posts, post formats, and author editing. Modern macOS features like versions for local drafts, auto-saving, and application sandboxing for security have been incorporated too. For link bloggers, MarsEdit has a Safari extension that sends highlighted text to the app as a block quote along with the article title and URL.
It's worth noting that I ran into a couple of issues with the final beta that were largely due to the size of the MacStories and the extent of its WordPress customizations. First, when you add a site in the app, it is set to download all posts by default. When I tried that with MacStories, our server interpreted the sudden volume of requests as a security threat and terminated the connection to MarsEdit. That was easily fixed by limiting the number of posts requested. Second, when I clicked 'Download Template' to fetch MacStories' WordPress theme for previewing drafts, MarsEdit triggered a Twitter plug-in we use when articles are published, which sent a tweet with placeholder text in it, which I wish it hadn't. However, these were issues that most users are unlikely to hit because they are site-specific.
I haven't tested MarsEdit 4 extensively, so this is not a review, but my initial impression is that the editor enhancements to version 4 will be a welcome update for existing users. MarsEdit is also a good choice for anyone who wants a highly-customizable solution for blogging primarily on a Mac.
I'm content writing in a text editor that has macOS and iOS versions, basic HTML previewing, and can send articles to the WordPress web app when I'm ready to publish. It's a simple setup, but it works well with MacStories' WordPress configuration. It does mean, however, that after final tweaks in the web app, my published articles are not always the same as what's in my text editor, which would not be the case with MarsEdit.
MarsEdit is available as a free download from the Mac App Store and directly from Red Sweater Software. An In-App Purchase unlocks publishing articles after a 14-day free trial. The full license for the upgraded app is free for anyone who purchased MarsEdit since June 1, 2017. Customers who purchased the app earlier will receive a discount.
Source: MarsEdit 4 Update Adds Editor Enhancements, WordPress Improvements, and More
DELETING WORDPRESS PROFILE
WordPress.com accounts cannot be deleted permanently once created.
But if you still wish to deactivate your account and leave WordPress, you can follow the instructions given here: https://en.support.wordpress.com/deleting-accounts/
"If you wish to leave WordPress.com, you can easily empty and delete your site. Once this is done remove all personal information from your Account Settings and change your password to a random string. This will leave your account inactive and prevent you from gaining access to it in the future."
I hope this helps clarify things. Feel free to get back if you have questions related to WordPress.com account and WordPress.com sites and I will be keen on helping you through it!
Source: DELETING WORDPRESS PROFILE
How to Create a Default Featured Image for WordPress Blog Posts
Featured images are an essential part of every blog post's identity; not just for the website, but for any place online where it might be shared.
WordPress does have a designated spot where you can easily upload a featured image for each post. However, it's easy to overlook it when you're busy trying to write a post, edit for readability, optimize for search, and schedule it to publish on the most optimal day and time.
So, what do you do? Hope that no one cares if your post is missing a featured image? Catch it after the fact and throw one in quickly, hoping that not too many visitors on the site or followers on social media noticed?
Nope. There's a better solution for this: You can create a default image for blog post thumbnails.
How to Create a Default Image for Blog Post ThumbnailsIdeally, every blog post on your website will have a unique featured image associated with it.
As I already mentioned, adding a featured image isn't always on the list of priorities when you're working on creating a blog post (though it really should be). While you wouldn't want to rely on a default featured image thumbnail to represent each and every one of your posts (think about how silly that screenshot above would look if the same image were used for each), it's a good practice to have a backup in place.
We all know how important images are to the users' experience when reading content. They're just as important in luring in visitors, followers, and newcomers to your posts. The enticing meta descriptions or post summaries are good and all, but the image? Well, the image often convinces people to actually read those descriptions in the first place.
You may have noticed – but most likely not – that we have a default featured image set up for the WPMU DEV blog. It appears for older posts in our archives, which, for whatever reason, are missing a featured image.
So, this is why you need a default blog post thumbnail set up for your WordPress site—for those rare occurrences when you forget to associate one with a post.
In terms of setting this up, there are three methods by which you can add a default image so no post will ever go featured image-less again. But first, you'll need to upload the default image you want to use to WordPress. Typically, a business logo, branded image, or recognizable mascot is the best option for this:
Option 1: Code It InYou can hard-code a default featured image into your theme's file. This way, any time a post thumbnail is not present, it will automatically pull in the default one you uploaded to WordPress.
Step 1Open your child theme file.
Step 2Add this code to the_post_thumbnail() function:
Step 3Update the "default-image.jpg" part of the code to the actual name of the featured image file you uploaded to WordPress.
Step 4Save your changes.
Option 2: Use the First Post ImageIf your blog posts already have images included within the content, then you shouldn't need to assign a default, generic image to them. The image content already exists; it just wasn't slotted into the featured image widget.
So, here is what you do:
Step 1Add this to your theme's function.php file:
Step 2You'll then have to add this code to your child theme file so the first image found in each post will be assigned as the thumbnail if there is no featured image:
Step 3Save all your changes.
Option 3: Use the Quick Featured Images PluginThe Quick Features Images plugin is a great choice not just for assigning a default post thumbnail, but also because it gives you more overall control of your featured images. It will help you:
The premium version of the plugin enables you to assign the first post image as the featured thumbnail. It also will create a featured image from other content in your post, like a photo gallery, the home page's main image, or embedded video content.
Curious to see how the free version works? Let's take a quick look:
Step 1Once you've installed and activated the plugin, quickly take a look at the settings. There isn't much to define, but you'll at least want to review the new column options this plugin wants to add to WordPress.
If you visit your main Posts or Pages lists, you'll then see that each entry either has a featured image associated with it:
Or no featured image associated with it:
This will be a big time-saver going forward when you're curious as to which pages or posts actually have thumbnails assigned to them.
Step 2As you can see, there are different actions you can take beneath each of the featured images (or lack thereof) within these lists. However, our concern today is on how to easily create a default post thumbnail without having to tediously deal with each featured image-less post.
So, return back to your new Featured Images menu tab. Go to Preset Featured Images.
You'll be given three rules to set:
The first will ask if you want to automatically assign the uploaded featured image to every blog post, regardless of whether you have a featured image or not. This option won't be ideal for most of you as it means every post will have the same image.
It's really only a good option if you set rules for how featured images are assigned to posts and pages and you have categories and taxonomies that would benefit from using the same uniform image. This could possibly work for case study pages, product categories, or posts authored by specific people.
The second rule will achieve the same effect as option #2 above. However, you'll have the benefit of not having to hard code this into your theme files while also getting to choose which page types you want this rule to apply to (so it wouldn't just be blog posts).
The final rule is the one everyone should experiment with. Even if you choose not to define different featured images for the various types of content on your blog, you'll still at least need to upload your preferred default image here. As you can see from the example above, you don't have to use the same exact image for all of your posts. If you want each thumbnail-less post to still have a relevant image assigned to it, you can establish that here.
Step 3Once you're done, save all your changes.
Wrapping UpSo, there you have it. Yet another way to automate the process of covering all your bases in WordPress. Although this one may not seem as significant as some of the other methods we've discussed in the past, remember that images are really important to the user experience. This is true not just here in WordPress, but also around the web as others encounter your content on social media, in RSS feeds, and so on.
Source: How to Create a Default Featured Image for WordPress Blog Posts
Customizing Admin Columns In WordPress
(This is a sponsored article.) If you manage a WordPress website, you've probably faced a common problem. How do you get insight into all of your content at a glance? WordPress' admin area does not show you much about your pages, posts, users and comments. That can make it hard to find the right page, to check if all associated fields are properly filled, or simply to get a general sense of your website's content. Does this sound familiar to you? Read on because we will demonstrate some simple custom solutions and a ready-to-deploy plugin to overcome this problem.
A modern WordPress website usually consists of much richer content than simply titles and chunks of text. Plugins such as Advanced Custom Fields and WooCommerce introduce custom fields that store specific pieces of content, such as prices, additional images, subtitles and so forth. Those functions on their own are great, but how do you keep track of all of that content when you can still only see the title, date and author in your admin screens? The answer is, you can't.
In this tutorial, we'll tackle this problem by showing you some easy-to-implement custom code. For those of you who don't want to code, we'll show you how to configure the Admin Columns plugin to do the job for you.
Also, you will learn how to:
Imagine that you're tasked with building or managing a website containing a real-estate agency's portfolio. On the website, you display pictures, house addresses, locations, number of rooms and other attributes. On the admin screen, you manage the portfolio, adding, removing and editing existing real estate. The columns WordPress shows by default (title, author, publication date, number of comments) are hardly relevant for your real-estate website, and you'd be more interested in seeing the existing pictures and information about the real-estate listings as a whole.
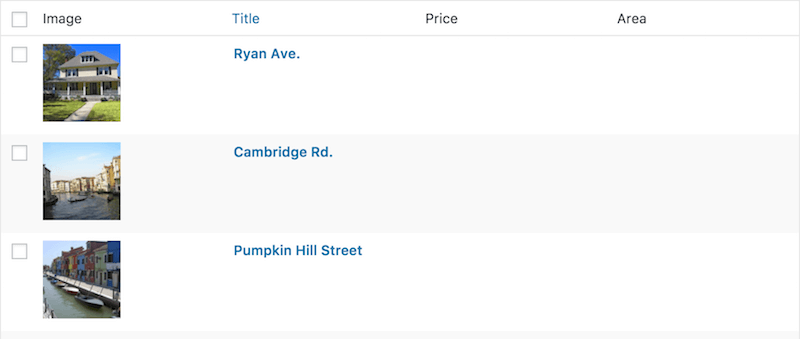
Let's look at a standard admin overview screen for custom post types:
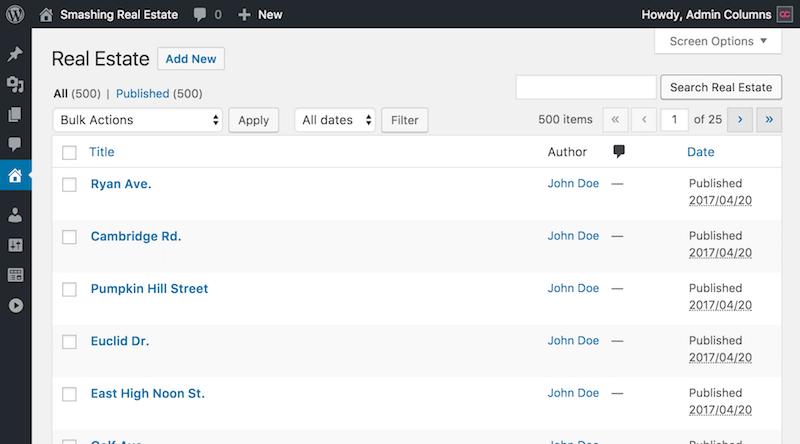 (View large version)
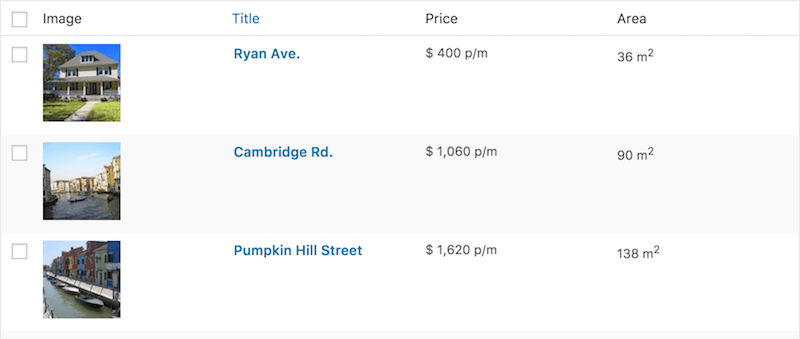
 This would be pretty useful if this were our website's blog posts or news items, right? But for our real-estate portfolio, this gives us no information at all. The same goes for web shops, car dealerships, creative portfolios and so forth. Luckily, there's a solution. We'll work towards a far more pleasing overview of our real-estate portfolio, which will look like this:
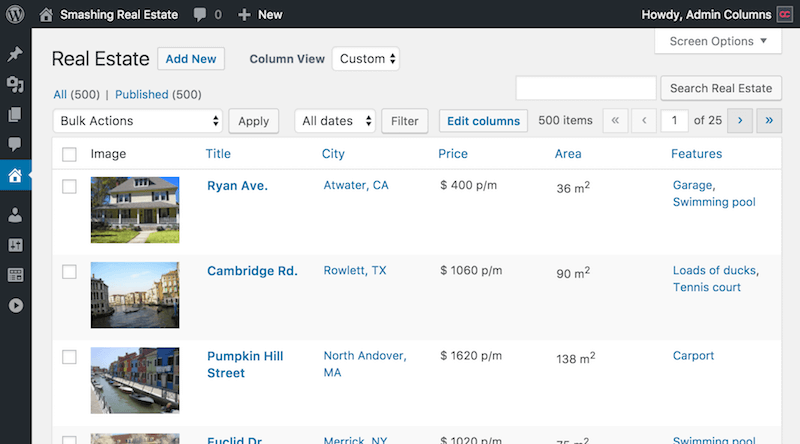 (View large version)
 As you can see, this gives us a lot of insight into our real-estate portfolio. It's now much easier to find, validate and, as you'll see, edit the content.
We'll provide a step-by-step guide to adding custom columns to your WordPress admin screens, sorting them and adding custom filters. We'll also show you how to do this with the Admin Columns plugin. (If you don't want to code, you can just skip to that part right away.)
Managing Columns With CodeFirst up is the management of columns for admin screens: adding columns that are specific to your content type, removing columns that are obsolete, and reordering columns. For this goal, WordPress offers the Columns API. It's available for users and taxonomies as well, but we'll focus on the posts screen. Changing the existing columns can be accomplished using two WordPress hooks: manage_[post_type]_posts_columns, which allows you to remove, reorder and add columns, and manage_[post_type]_posts_custom_column. In place of [post_type], enter the post type you wish to target. For pages, for example, you would use manage_page_posts_columns and manage_page_posts_custom_column, respectively.
If you haven't heard about WordPress hooks, we encourage you to move on to the "Managing Columns With the Admin Columns Plugin" section. It explains how you can manage your columns without touching any code. But if you feel like learning, then read more about WordPress hooks (filters and actions).
"Where Do I Place My Code?"To add all of this custom functionality, we need a place to run our code. This is best done in a plugin. In this tutorial, for example, we're creating a custom plugin to run all of this code in. If you don't know how to create a plugin, you can learn how.
All of the code snippets we'll provide will go in our custom plugin. It is advisable to place such code in a plugin, not in your theme.
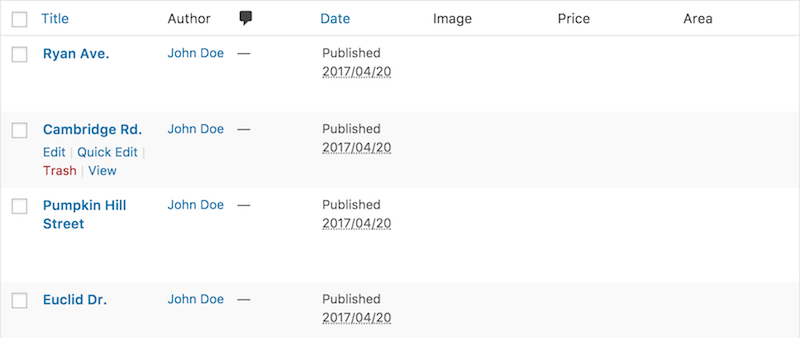
Adding, Removing and Reordering ColumnsThe first hook for managing columns (manage_posts_columns) is a filter that handles the array of columns. The standard array of filters for the posts overview is this:
[ [cb] => <input type="checkbox" /> [title] => Title [author] => Author [categories] => Categories [tags] => Tags [comments] => [..] Comments [..] [date] => Date ]We're going to remove a few columns from this list and add a few. To do so, we'll add a callback to the manage_posts_columns filter and append our custom columns to the columns array. Note that we're using the manage_realestate_posts_columns hook. Here, realestate is the name of our post type, passed as the first argument to the register_post_type function for registering custom post types. We use it in place of [post_type] in the manage_[post_type]_posts_columns filter.
add_filter( 'manage_realestate_posts_columns', 'smashing_filter_posts_columns' ); function smashing_filter_posts_columns( $columns ) { $columns['image'] = __( 'Image' ); $columns['price'] = __( 'Price', 'smashing' ); $columns['area'] = __( 'Area', 'smashing' ); return $columns; }The first line adds our function smashing_filter_posts_columns as a callback to the filter that handles the columns that are displayed. The second line defines the callback function. Lines 2 to 4 add our custom columns to the list of columns. Finally, line 6 returns the resulting columns list.
Note: The smashing_ part before our functions is just a best practice to make sure that our function name is unique in WordPress. The __ function is used for translating the string to the user's preferred language. Notice that for both "Price" and "Area," we use smashing as the text domain, which WordPress uses to determine what source should be used to translate the string. We can omit this for translating "Image" because WordPress already includes translations of this word itself. You can read more about text domains in the WordPress Codex.
We've added columns to display an image, the price and the area, and the array with the new columns has been returned. The resulting real-estate list looks like this:
 (View large version)
 We still have to do two things:
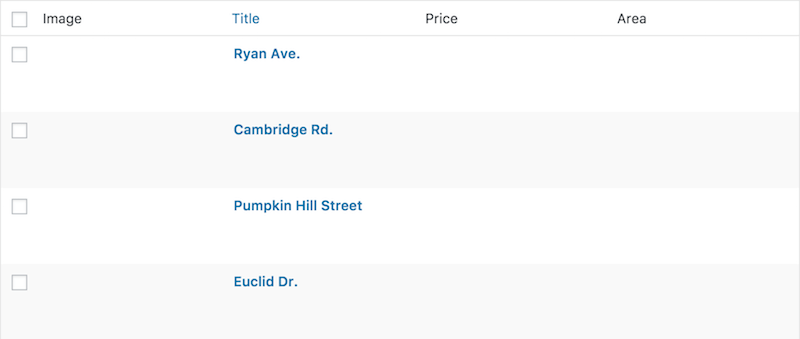
We'll modify our function to accomplish this. Note that we do not explicitly remove the three columns mentioned above, but simply construct an entire new array of columns precisely as we need them. The modified lines are highlighted.
add_filter( 'manage_realestate_posts_columns', 'smashing_realestate_columns' ); function smashing_realestate_columns( $columns ) { $columns = array( 'cb' => $columns['cb'], 'image' => __( 'Image' ), 'title' => __( 'Title' ), 'price' => __( 'Price', 'smashing' ), 'area' => __( 'Area', 'smashing' ), ); return $columns; }Our new real-estate overview screen is starting to take shape: Irrelevant columns have been removed, and new ones have been added in the right positions.
 (View large version) Populating Columns
 Next up is populating our columns. Again, WordPress provides a pretty simple hook to do so: the manage_[post_type]_posts_column action. Unlike the previously discussed hook, this is not a filter, so it only allows us to add content, not to change it. Thus, in the callback for this action, we're simply going to echo the column content that we want to display.
Let's start by adding the "Image" column.
add_action( 'manage_realestate_posts_custom_column', 'smashing_realestate_column', 10, 2); function smashing_realestate_column( $column, $post_id ) { // Image column if ( 'image' === $column ) { echo get_the_post_thumbnail( $post_id, array(80, 80) ); } }We added a callback function, smashing_realestate_column, to the action 'manage_realestate_posts_custom_column', taking two parameters: the column name and the post ID. This is indicated by the fourth parameter, add_action: It specifies the number of arguments expected by the callback function. The third parameter, called the priority of the hook, determines in what order the callback functions registered to the hook should be executed. We'll leave it at the default, which is 10. This callback function populates a single post's "Image" column.
 (View large version)
 The remaining two columns, "Price" and "Area," are stored as custom fields with the keys price_per_month and area, respectively. We'll display these in the same way as we did with the image, displaying "n/a" when a price or surface area value is not available. The implementation is very similar for both columns. Starting with the price column, the changed lines in our smashing_realestate_column function are highlighted in the code block below.
add_action( 'manage_realestate_posts_custom_column', 'smashing_realestate_column', 10, 2); function smashing_realestate_column( $column, $post_id ) { // Image column if ( $column == 'image' ) { echo get_the_post_thumbnail( $post_id, array( 80, 80 ) ); } // Monthly price column if ( 'price' === $column ) { $price = get_post_meta( $post_id, 'price_per_month', true ); if ( ! $price ) { _e( 'n/a' ); } else { echo '$ ' . number_format( $price, 0, '.', ',' ) . ' p/m'; } } }Next up is the area column. Except for the unit (square meters, m2, instead of dollars), the code is pretty much the same:
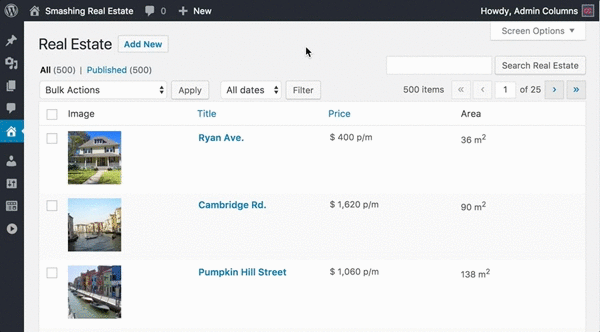
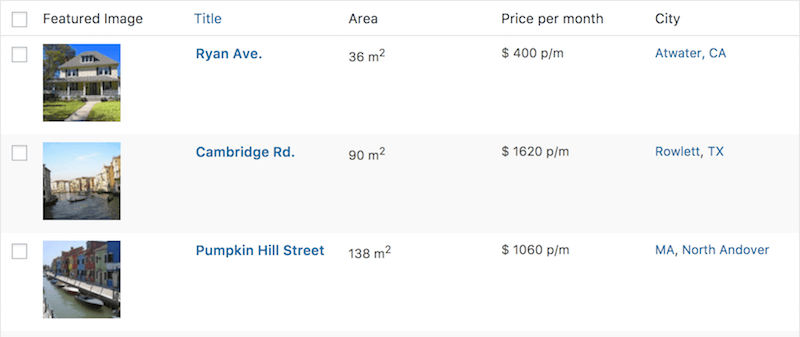
add_action( 'manage_realestate_posts_custom_column', 'smashing_realestate_column', 10, 2 ); function smashing_realestate_column( $column, $post_id ) { [...] // Surface area column if ( 'area' === $column ) { $area = get_post_meta( $post_id, 'area', true ); if ( ! $area ) { _e( 'n/a' ); } else { echo number_format( $area, 0, '.', ',' ) . ' m2'; } } }That's it! Our real-estate overview page now contains all relevant information that we want to display:
 (View large version)
 Let's move on to some of the more funky stuff. Let's add some sorting functionality to our columns!
Making Columns SortableMaking columns sortable is relatively easy in WordPress, yet it's rarely implemented for custom columns. Sorting helps you organize content and enables you to find content quickly. For example, we could sort our real-estate overview by price and then find our cheapest and most expensive pieces of property.
We'll start by adding our "price" column to the list of sortable columns:
add_filter( 'manage_edit-realestate_sortable_columns', 'smashing_realestate_sortable_columns'); function smashing_realestate_sortable_columns( $columns ) { $columns['price'] = 'price_per_month'; return $columns; }This code hooks into the manage_edit-realestate_sortable_columns filter and adds smashing_realestate_sortable_columns as a callback function (line 1). The "price" column is made sortable by adding it to the list of sortable columns in line 3. Note that the array key, price, is the name we've given our column before. The array value is used to tell WordPress what it should sort by. We could, for example, use WordPress' native sorting strategies to sort by title, date or comment count.
In our case, however, we want to sort by a custom field. This requires us to create another function, which needs to alter the posts query if we're trying to sort by price. We're going to use the pre_get_posts action. It allows us to change the WP_Query object (the object that WordPress uses to query posts) and fires before posts are queried. We check whether to sort by price and, if so, change the query accordingly:
add_action( 'pre_get_posts', 'smashing_posts_orderby' ); function smashing_posts_orderby( $query ) { if( ! is_admin() || ! $query->is_main_query() ) { return; } if ( 'price_per_month' === $query->get( 'orderby') ) { $query->set( 'orderby', 'meta_value' ); $query->set( 'meta_key', 'price_per_month' ); $query->set( 'meta_type', 'numeric' ); } }Lines 1 and 2 add the callback function to the action and start the definition of the callback function, respectively. Line 3 then checks whether we're in the admin panel and whether the query is the main posts query (see the Codex for more information). If not, we don't change the query. Then, we check whether the current sorting strategy is by price. If it is, we adjust the query accordingly: We set the meta_key value to price_per_month, telling WordPress to retrieve this custom field for all real estate, and we set the orderby key to meta_value, which tells WordPress to sort by the value belonging to the specified meta key. Finally, we tell WordPress to sort numerically instead of alphabetically, because "price" is a numerical column.
Note: You might have noticed that the filter we hook into is named manage_edit-realestate_sortable_columns, whereas you might have expected it to be manage_realestate_sortable_columns (without the edit-). This is simply an inconsistency in filter naming in WordPress.
The result is a sortable price column:
The same procedure can be repeated for the "area" column. For textual columns, which should be sorted alphabetically, be sure to leave out the $query->set( 'meta_type', 'numeric' ) part.
Managing Columns With The Admin Columns PluginNow that we've covered the programming part of this tutorial, it's time to move on to the much simpler method: using the Admin Columns plugin. Without touching any code and using a simple drag-and-drop interface, you can manage columns with just a few clicks. More than 150 column types exist. It comes with optional fields that let you customize how a column is named and behaves. In this last part of the tutorial, we're going to show you how to set up Admin Columns to create the exact same overview as before. On top of that, we will show you how you can then filter and edit content directly from the content-overview screens.
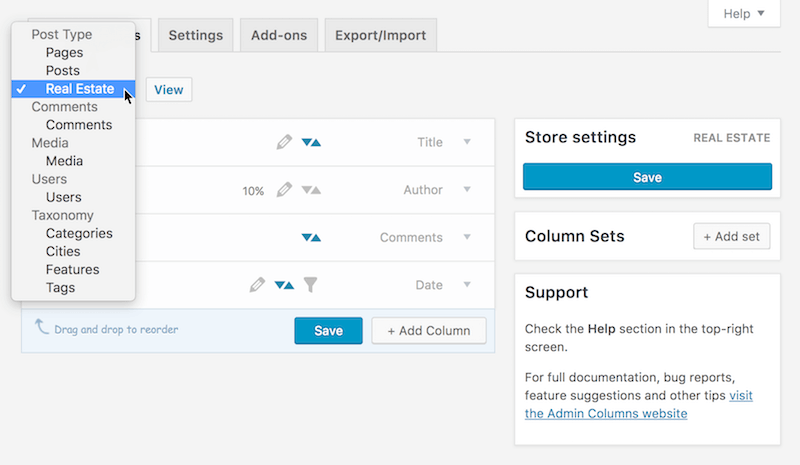
First off, install Admin Columns as you would install any plugin, and activate it. It's ready for use right away, so let's start to manage our columns by going to the "Column Settings" page.
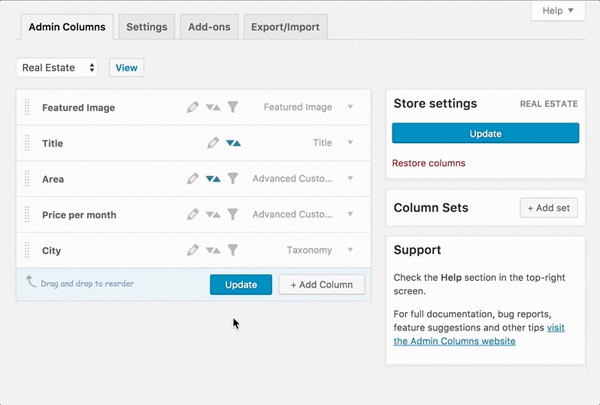
Admin Columns lets you control the columns per content type (for example, posts, pages, users or comments) using the dropdown box highlighted in the image above. In our case, we will select the post type "Real Estate." You will see the screen immediately showing the columns that are currently active for this post type.
 (View large version) Adding, Removing and Reordering Columns
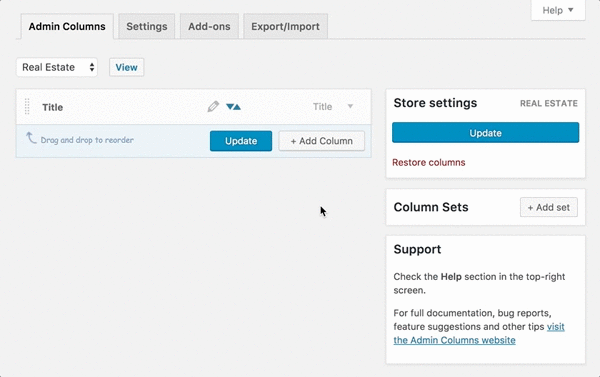
 Let's clean up a bit by removing columns we don't need for our real-estate overview:
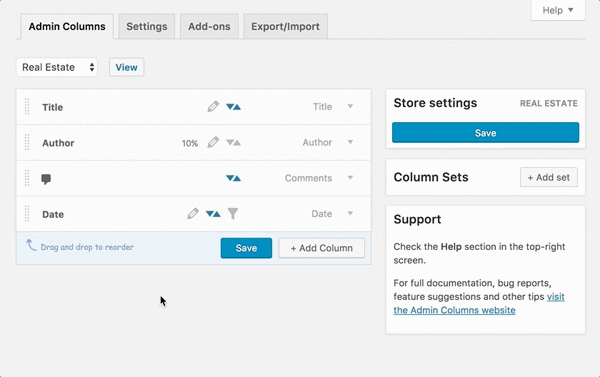
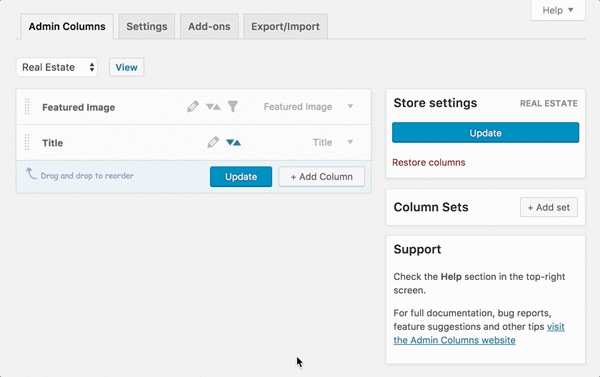
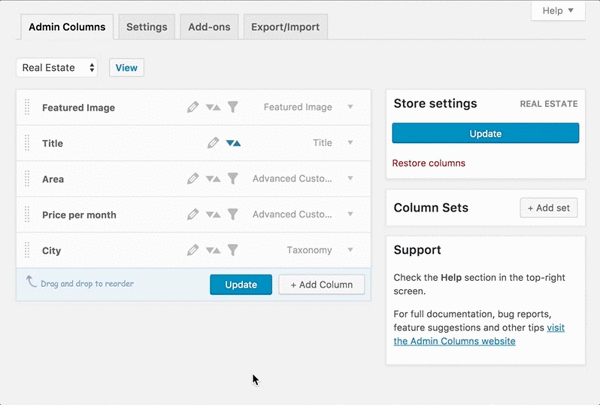
Wasn't that easy? We will continue by adding our first relevant column: the featured image that shows a picture of the property. To do so, simply click the "Add Column" button, choose the "Featured Image" column type from the dropdown, and fill in the appropriate settings:
As you can see, Admin Columns shows relevant display options for your columns to give you full control over their appearance. Here, you're asked to specify the dimensions of the image to display. Later, we will see that Admin Columns shows the appropriate options when you select a different column type. For these options, Admin Columns tries to present sensible defaults, to minimize the time required to add new columns.
The last part showed us how to drag the column to the first position. Admin Columns lets you reorder columns simply by dragging them around. Our real-estate screen now looks like this:
 (View large version)
 We're now going to add the two columns to display the property's living area and monthly rent. Because we've added these custom fields using the Advanced Custom Fields plugin, we will use Admin Columns' ACF integration plugin for this task. However, the "Custom Field" column would have also sufficed for this purpose.
The animation below shows the process of adding the "Area" and "Price" columns:
Note: Admin Columns offers integration add-ons for quite a few other plugins, including WooCommerce, Ninja Forms and Yoast SEO.
For those who followed the code examples and paid close attention, we did not add the "City" column. It's a little trickier to do that with code, but with Admin Columns it's a breeze. We simply select the "Taxonomy" column and pick the "City" taxonomy, and voilà! Our result is there. Didn't we tell you? It's a breeze!
 (View large version)
 Depending on your mouse-handling speed, we've achieved this result, from top to bottom, in somewhere between two and three minutes!
Sorting and Filtering With Admin ColumnsMost of what you've seen so far is part of the free version of Admin Columns, which can be downloaded from WordPress.org. However, there is also Admin Columns Pro, which offers additional features. We'll discuss the most prominent features for this use case: sorting, filtering and editing. These features will help you to quickly find and update your content right from the overview screen.
Although the features might be pretty self-explanatory, I'll explain them really quickly in the context of Admin Columns.
Sorting will display your content in a particular order based on the value of a column. It's great for getting insight into your content very quickly. For example, it enables you see which pages have a page template and to order them alphabetically. For a regular blog, you could quickly find out which users have authored the highest number of posts by sorting users according to their post count.
Filtering helps you to find content faster. You can filter columns that have a specific value, or a value within some range (for numeric columns) or without any value set at all. For instance, you could find e-commerce products within a price range, or posts missing a featured image or custom field. You could even use multiple filters together to target content more precisely.
Let's get back to our use case and consider a simple example: We want to find houses with the largest surface areas. This will take us only a few seconds because we can simply make the "Area" column sortable and sort by that column in the real-estate overview screen:
Now, let's take it a step further by adding a filter: We want to find the top 10 houses with the largest surface areas, but only those with a monthly rental price between $300 and $500. Again, a few clicks are enough:
There are, of course, many other ways to sort and filter. Combined, the features are a powerful tool to gain insight into your content.
Editing With Admin ColumnsThe real-estate overview screen now shows all relevant information and allows you to find the content you need. However, one thing is lacking: To edit our content, we have to go to the editing page, find the fields we want to change, update them, click "Update," and go back to our overview screen.
What if we could do the same process in just three simple steps: click, edit, save? With Admin Columns Pro, we can.

The screenshot above shows "direct editing" mode for the property title, and it's available for almost all custom columns. In Admin Columns Pro, inline editing can be toggled from the columns settings screen. It automatically detects your content type and adds editability accordingly. With images, for instance, the media gallery will pop up.
In this example, we've used the Advanced Custom Fields add-on for Admin Columns, which comes with all business and developer licenses. It detects your ACF fields and adds them as possible columns. They are automatically sortable, filterable and editable — just toggle the corresponding icon.
The result is pretty neat: Our real-estate overview screen adds editing icons to all cells, and just by clicking, editing and saving, we can update our content. Let's see that in practice: We've enabled direct editing for all of our custom columns, and we're going to use that functionality to quickly update our content:
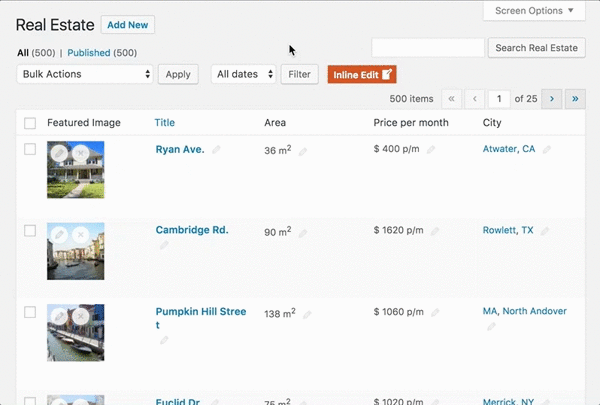
The changes are instantly saved. Should anything go wrong, undo and redo buttons are available to quickly revert.
Direct editing is supported for almost all columns. With the Advanced Custom Fields and WooCommerce add-ons, Admin Columns gives you a native editing experience as if you were editing from the details page.
Wrapping UpAdmin Columns can do much more cool stuff, but there's just not enough room in this article. Why not take a look and check out some of the awesome features for yourself? We hope to see you there!
(mc, ra, al, yk, il)
Source: Customizing Admin Columns In WordPress